


Getting an email domain for your business with a custom domain extension look professional and helps your business credibility.
People and other business owners want to trust emails coming from a professional looking account. A custom domain email address immediately makes your business and online presence look more credible.
In this guide, we will show you 5 different ways to get an email domain and create email accounts using it.
Email domain definition
An email domain is the part of an email address that comes after the @ symbol.
If your domain name is yoursite.com, your email domain is @yoursite.com.
You could set up several @yoursite.com email accounts, for example, [email protected], [email protected], [email protected], etc.
In the email address [email protected], yoursite.com is the domain and info is the email address extension.
To get an email domain, you will first need to register a domain name. There are some domain registrars that offer a free domain name, we will take a look at them.
After you’ve registered a domain name, you can either purchase an email service or create an email address on your web hosting subscription.
A web hosting subscription also lets you build a website.
When you’re running a business, you’ll likely need both an email and website, so it makes sense to get both services at the same time.
There are a few different ways to get a free email domain, keep reading to find out how.
Each method covered in this guide provides a way to get a free domain name, free email address, or both.
Let’s get started!
Skystra
Skystra is one of our top rated WordPress hosting companies for their excellent service, speed, and performance.
They bundle in free email across all of their web hosting plans and offer transparent pricing on domain names.
For $12 per month, you will get staging sites and SSH, and for $7 per month, you can get WordPress hosting that includes hosting for 1 website, unlimited email accounts, and a free SSL certificate.
Skystra
GET EMAIL DOMAIN AND FREE EMAIL
Skystra’s email service includes a webmail interface, email forwarding, email autoresponders, catch-all email, global email filters, and advanced spam filters.
You can also connect it to any third-party email client across your devices including Gmail, Outlook, and Apple Mail.
Here are step-by-step instructions to get free email with Skystra.
1. Set up web hosting account at Skystra
Go to the Skystra website and click on Try for free button under the plan you want to get.

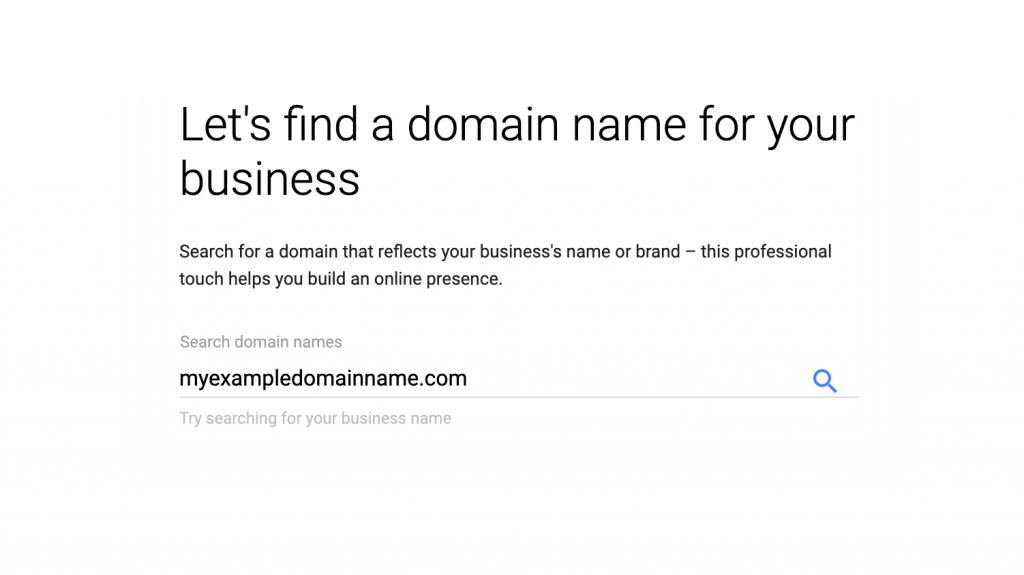
On the next page, you’ll be on the Choose a domain step. Under the Register a new domain tab, there is a domain search bar, you can type your domain name in there.
To change your email domain extension to a different TLD, select from a range of available extensions using the dropdown.
Once you’ve typed your domain name into the search bar, click the Check button.
If your domain name is available, you’ll see a green confirmation message, you can press Add to Cart then Continue to go to the next step.

On the next page, you can choose your billing cycle and whether or not you want to enable security and backups. Under Additional Services, make sure the Free Website Migration is selected if you need your website migrated for you.

You’ll be able to add ID protection for $4.89 per year. ID Protection masks your contact details on public domain name records while still providing a level of anonymity. You are not required to use it, however, we always recommend enabling it.

After, you can review your order and check out. Skystra automatically applies a 100% one-time discount on new web hosting accounts.
Once you’ve signed up to Skystra, you’ll log into your Skystra client account and log in to your cPanel interface.
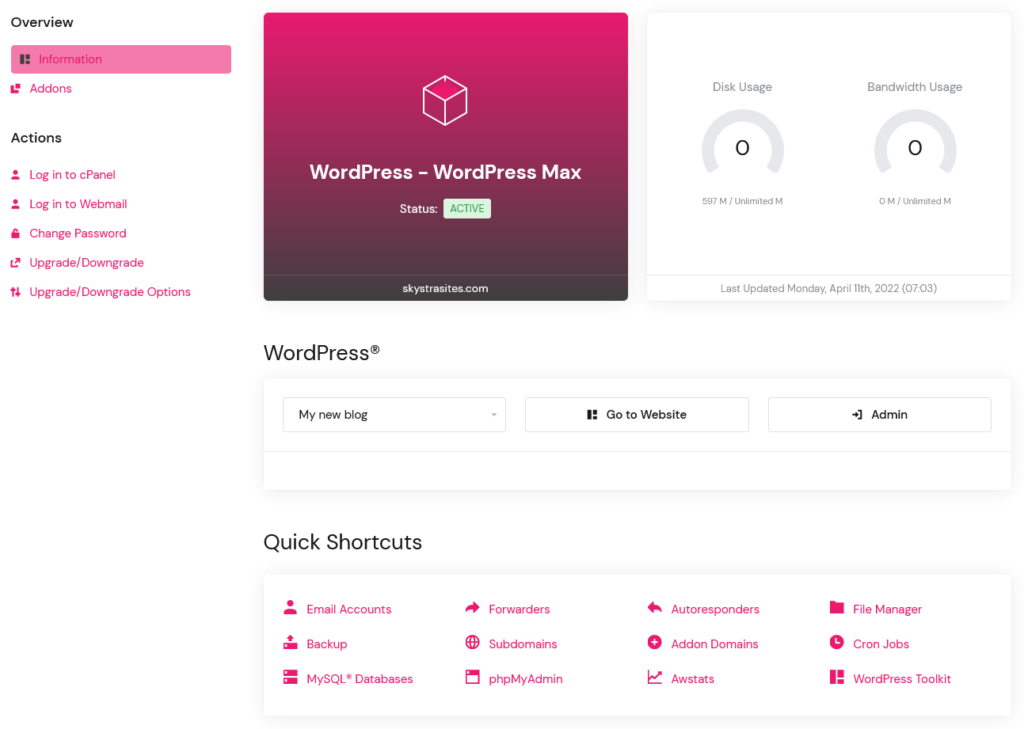
On cPanel, you will manage your web hosting service and create free email accounts for your new domain name.
2. Create free email accounts at Skystra
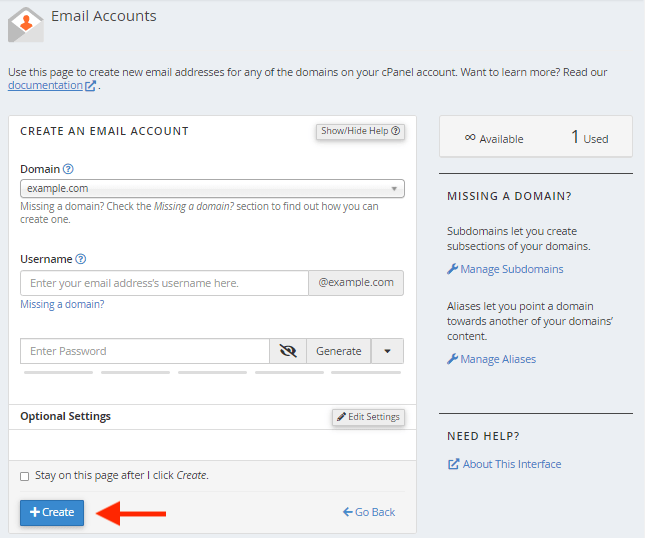
In cPanel, click on Email Accounts under the Email tab. When you get to the email management area, click the ‘create’ button to create a free email domain.

Next, enter the email address and password you want for your new account. Then choose how much space to allocate as your email quota.

Once you click the Create button on the email management area, your new email address with your custom email domain will be created on your Skystra web hosting account.
3. Use your email accounts created at Skystra
There are three different and easy ways to use your free email accounts created at Skystra, we’ll show you all three.
Webmail
Skystra offers a convenient webmail interface for managing your email directly from your browser.
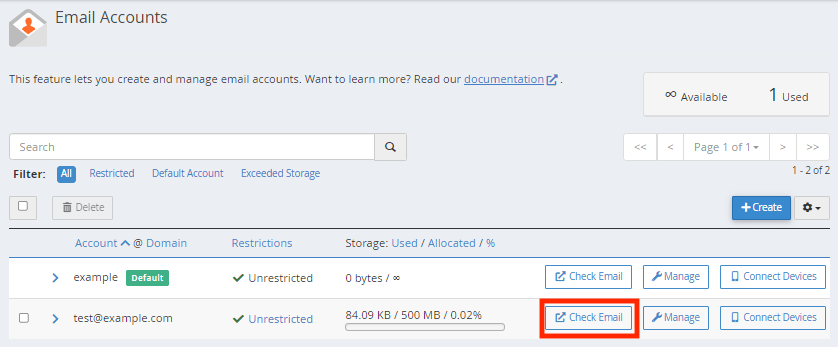
On cPanel, click on Email Accounts.
Find your email account and then click the “Check Email” button next to it.

Under Roundcube, click the Open button. This will open up your email account inbox in webmail directly within your browser.

Email apps
You can also use your Skystra created email accounts to send and receive emails using email email apps such as Outlook, Gmail, Apple Mail, and Thunderbird.
Go back to cPanel, and click on Email Accounts.
Next to your email address, click on Connected Devices.

You will see all available email app setup instructions listed under Mail Client Automatic Configuration Scripts.

Right under, you’ll find your Mail Client Manual Settings to connect your email account to third-party apps manually.
We always recommend you use the Secure SSL/TLS settings to route through a secure connection.

Gmail
Once you’ve set up your custom domain and email at Skystra, you can configure a Gmail email forwarder to receive and send emails from your free Gmail.com account and app.
Open your Gmail and click on the gear icon in the top-right corner.
Select settings from drop-down menu.

To set up your domain name to get emails, go to the “Accounts and Import” tab and select “Add an email account.”

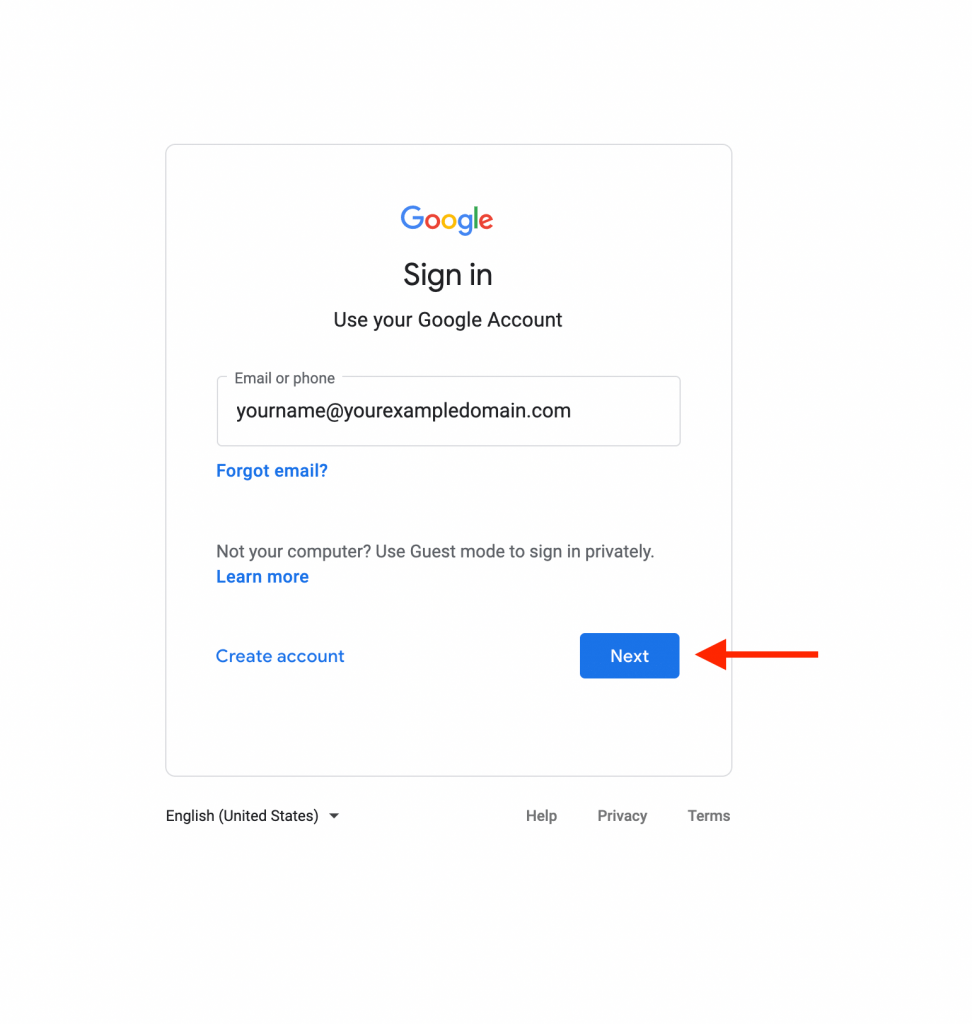
A browser window will open for you where you can enter your email address.
Enter your email address, and click the Next button.

On the next page, you will put in your full email details.
Your username will be your email address and the password, your email address password.
The POP server is your domain name with a mail prefix. For example, mail.yoursite.com
Set the port to 995.
Enable the following:
‘Leave a copy of the retrieved message on the server’
‘Always use a secure connection (SSL)…’ and set the port value to 995.
‘Label incoming message: your email address’
Review and then click on the Add account button.

Next, choose if you would like to use your email domain to send emails directly from Gmail. Select Yes and click Next.

After, you will be asked to fill in the “from name” field. Normally people put in their first name, first name and last name, or their business name.
You can also opt to use the account as an alias.
An alias is an extra email address you can set up for your domain to receive emails. It’s handy if you have multiple email accounts you’d like to manage from the same inbox within Gmail.
Click on the Next Step button.

On the next page, you will need to provide your server’s SMTP (Simple Mail Transfer Protocol) information. This is the same information listed on your cPanel under Mail Client Manual Settings (SSL/TLS settings).
The SMTP outgoing server is mail.yourdomain.com (for example, mail.yoursite.com).
Enter your username, which is your full email address. In the password field, put in your email address password.
Click on the ‘Add account’ button.

Gmail will now send a verification code to your email address (the one you created at Skystra).
Copy and paste the code from these messages to finish the SMTP setup.

Once you’ve verified the account, you’ll be able to send, receive, and check your Skystra email directly within your Gmail app.

Bluehost
Bluehost is a beginner and budget friendly web host. They rank high on our best WordPress hosting list for their ease of use and affordability.
Bluehost web hosting plans start at $2.75 per month and they include a free email domain, free email, and free SSL certificate on new accounts.
Bluehost
GET FREE EMAIL DOMAIN AND FREE EMAIL
Bluehost offers a number of email features including webmail, forwarders, and auto-responders.
Bluehost also has spam filter protection to help keep your inbox clean from spam.
1. Set up web hosting account at Bluehost
To get a free email domain at Bluehost, go to the Bluehost website.
Once you’re on the Bluehost website, click the Get Started button.
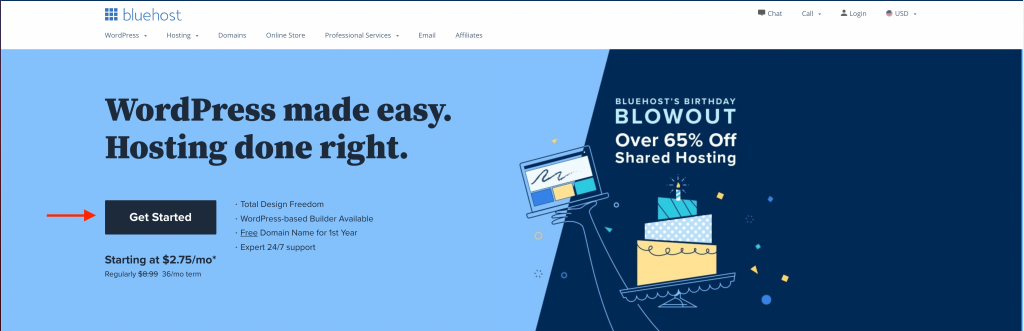
On the next page, you can sign up to a web hosting plan.
Click the Select button once you’ve picked a plan.

You’ll then go to the first step of the sign up process, to register your free email domain.
By default, the .com domain extension is selected, however you can select a different TLD from the dropdown.
Type in your domain name in the Create a new domain search bar.
Once you’ve typed in your domain name, click the Next button. If the domain you entered is available, you’ll be taken to a page where you can register and purchase it with your web hosting plan.

On the checkout page, fill in your personal details.
Under the package extras section, you will notice a free domain name registration is indicated, along with a free SSL certificate.
You can add paid extras, like security and SEO tools if you’d like to.

After you’ve reviewed your selection, you can put in your payment information and purchase your Bluehost web hosting plan.
The domain name you entered will be automatically registered for free.
Bluehost applies a 70% discount on new web hosting accounts, that means you will pay only $2.75 per month on their starter web hosting plan, with a free email domain and email included.
2. Create free email accounts at Bluehost
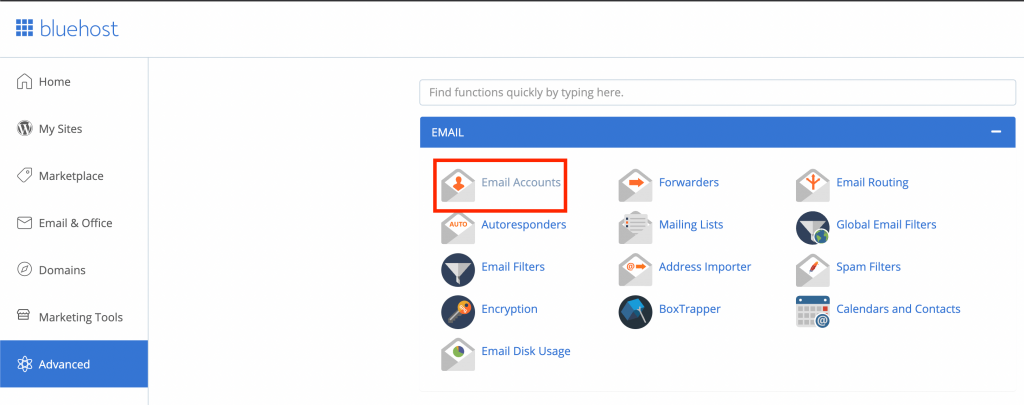
Once you’ve signed up to Bluehost, log into your Bluehost client account and click the Advanced tab on the left hand menu.
This will take you to a web hosting management panel.
Once you’re on the Bluehost web hosting management panel, click on Email Accounts under the Email section.

On the next page, click the Create button.

Create your email account and set up or generate a secure password. Also set your mailbox storage allocation.
Once you’ve filled in the detailed, click on the Create button.

Your free email domain is not set up at Bluehost!
You can repeat the same steps to create new email accounts.
3. Use your email accounts created at Bluehost
There are a few ways to use your free Bluehost email accounts, let’s explore each method.
Webmail
Bluehost provides a browser webmail interface where you can check, send, and receive email.
Go back to your Bluehost account, click on Advanced.
Under Email, click on Email Accounts.
You’ll get redirected to the email accounts page, find your email address and select the “Check Email” button next to it.

On the next page, select the Open button next to the available webmail programs. We recommend sticking with Roundcube, it works well.
Once RoundCube opens, you will see your email inbox on webmail directly on your browser.
Email apps
Another way to use your free Bluehost email accounts is by sending and receiving emails using popular email apps such as Outlook, Gmail, Apple Mail, and Thunderbird.
Return to your Bluehost account. Click on Advanced.
Select Email Accounts. Find your email account, and next to it, click on the Connected Devices button.

You’ll be taken to a mail configuration settings page.
There is a list of all available email configuration scripts, which provide detailed instructions for how to set up your email on different apps.

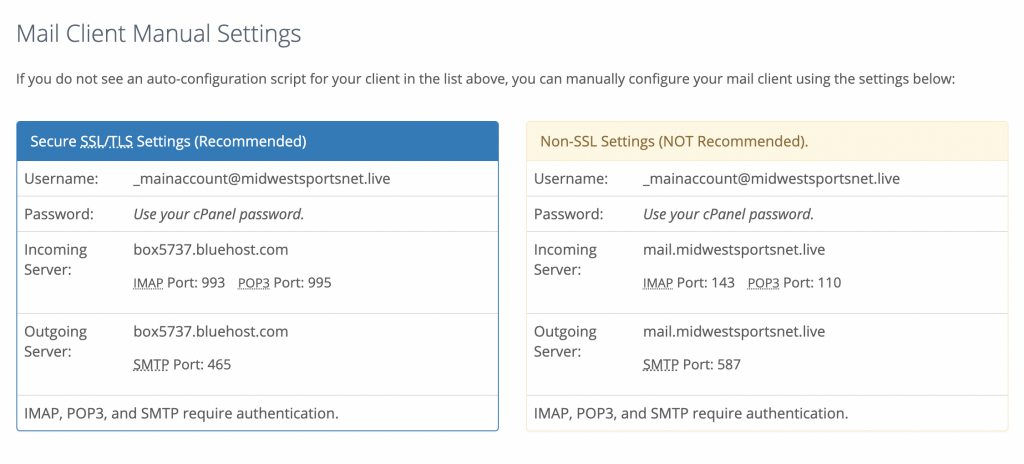
Below, you will find instructions on how to set up your mail client manually for third-party apps.
We always recommend using the Secure SSL/TLS settings provided, to route your emails through a secure connection on third-party apps.
Gmail
Once you have set up a custom domain for your email at Bluehost, you can configure Gmail to send and receive emails from that account inside of your Gmail app.
From your Gmail inbox, select the gear icon in the top right corner of your screen. From the drop-down menu, click on See all settings.
To set up email on your newly purchased domain name, go to the “Accounts and Import” tab and select “Add an email account.”
A browser window will open for you. Enter your email address in the space provided.
Below is a list of details to complete on the next page:
Your username and password will be the same ones you set up on the Bluehost web management platform.
Your email address is the POP server suffix of your domain name, i.e., mail.yoursite.com
To set up a free email account on your domain, you’ll first need to select Always use a secure connection (SSL). Set the port value to 995.
Once completed, click on the Add Account button and in the pop-up box that opens, enter your first name or full name.
Next, choose if you would like to use your email domain to send emails directly from Gmail. Select Yes and click Next.
Follow the next steps to finish the setup and verification. Once verified, you’ll be able to use your free email domain and email account from Bluehost on your Gmail app.
HostGator
HostGator gives you a free email domain when you sign up for their hosting plan.
At HostGator, you’ll get excellent web hosting, a free email domain, and free email. They’re a pretty good choice for startups and small businesses on a budget.
HostGator’s starter web hosting plan is $2.75 per month. You get a free email domain and unlimited free email accounts on that plan.
That means you can also build your website and create professional email account at the same time.
HostGator
GET FREE EMAIL DOMAIN AND FREE EMAIL
HostGator provides webmail, autoresponders, catch-all email, and third-party integration with any email client across devices.
Here is how you can get a free email domain with HostGator.
1. Set up web hosting account at HostGator
Go to the HostGator website.
When you get to the HostGator website, click the Get Started button.

You’ll be directed to the web hosting pricing page.
Choose a plan by clicking the Buy now button.

After you pick a plan, you’ll be redirected to the checkout page. Under the “Choose a Domain” section, put in your domain name in the search bar.
When creating a new domain, the default extension is .com. You can select another one in the dropdown.
If your domain name is available and HostGator displays a FREE label next to it, then you can register the a free domain name and set up free email on it.

Once you’ve selected your free domain name, you can also choose registration for additional services, like website security and data backups. These are completely optional.

Finish checking out by putting in your billing details.
Once you’re done, your domain name and web hosting account at HostGator are ready to use.
2. Create free email accounts at HostGator
Login to your HostGator account and click on Launch cPanel from your Dashboard.

This will open up your web management panel, select Email Accounts under the Email section.

Create your new email account and generate a secure password. Set your mailbox storage quota and hit the create account button.
You now have an email address on your free email domain at HostGator!
Repeat the same process to create additional email accounts.
3. Use your email accounts created at HostGator
There are a few different ways to use your HostGator email accounts.
Webmail
On your HostGator web management platform, you can access an easy to use webmail interface for your email.
On cPanel, click on Email Accounts.
On the next page, find your email and click on the “Check Email” button.
From the next page, select an email program (we recommend RoundCube) and your webmail will open up.
You can also access your HostGator webmail from https://yoursite.com/webmail (replace yoursite.com with your actual domain name).
Email apps
It’s also possible to access your custom domain email inbox by using third-party mail apps on your computer and phone.
To set up your HostGator email accounts on third-party apps like Gmail, Outlook, or Apple Mail across devices, go to your web management platform.
Click on Email Accounts. Find your email account, and next to it, click on Connected Devices.
Your manual POP and IMAP email setup settings are listed under Secure SSL/TLS. Always use the SSL/TLS connection details to route your emails through securely.
Gmail
Follow the steps below to connect your HostGator email to Gmail.
Click on your email account.
In the next window, click on Secure SSL/TLS. Click Add Mail Client.
Select IMAP in the pop-up menu then click Next Step.
Enter your full HostGator email address and password information and click Save Settings.
To verify it worked, open Gmail from your browser and click the gear icon. Click Settings.
At the bottom of the page, select the Accounts and Imports tab. Next to “Accounts,” click Show, then Import mail accounts, then Connected server (IMAP). Your HostGator email address should appear there.
Microsoft 365
Microsoft 365 is part of Microsoft’s (NASDAQ: MSFT) productivity suite, offering email services.
It is a professional email platform geared to small and medium sized businesses as well as educational institutions.
Microsoft 365 provides professional email, a calendar, contacts, and a tasks manager all on one dashboard.
It’s a great option for people who want a productivity suite along with professional email.
Microsoft 365
GET PROFESSIONAL EMAIL
Follow these steps to set up your email domain and email address with Microsoft 365.
1. Set up Microsoft 365 subscription
Go to the Microsoft 365 website, and choose a subscription category.
Once you’ve picked, find a suitable email plan and click on the Buy Now button.

On the Microsoft 365 registration page, you’ll be asked to provide an email address. This can be any active email address and will be used by Microsoft to create your client account.
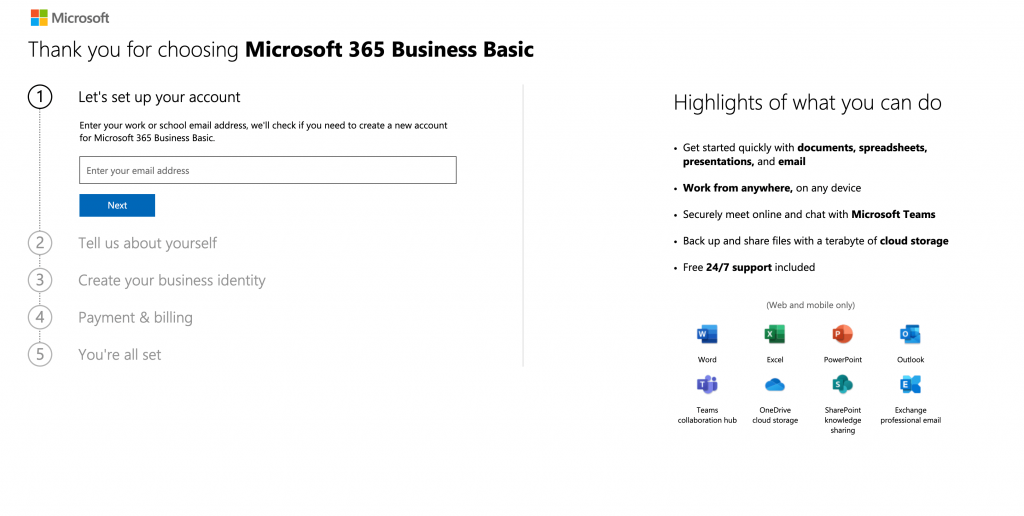
Next, you’ll have to put in a phone number to verify your Microsoft account by call or text.
When you choose a domain name, Microsoft will automatically assign a subdomain .onmicrosoft.com.
You can add a custom domain name separately, we’ll cover that on the next step below.
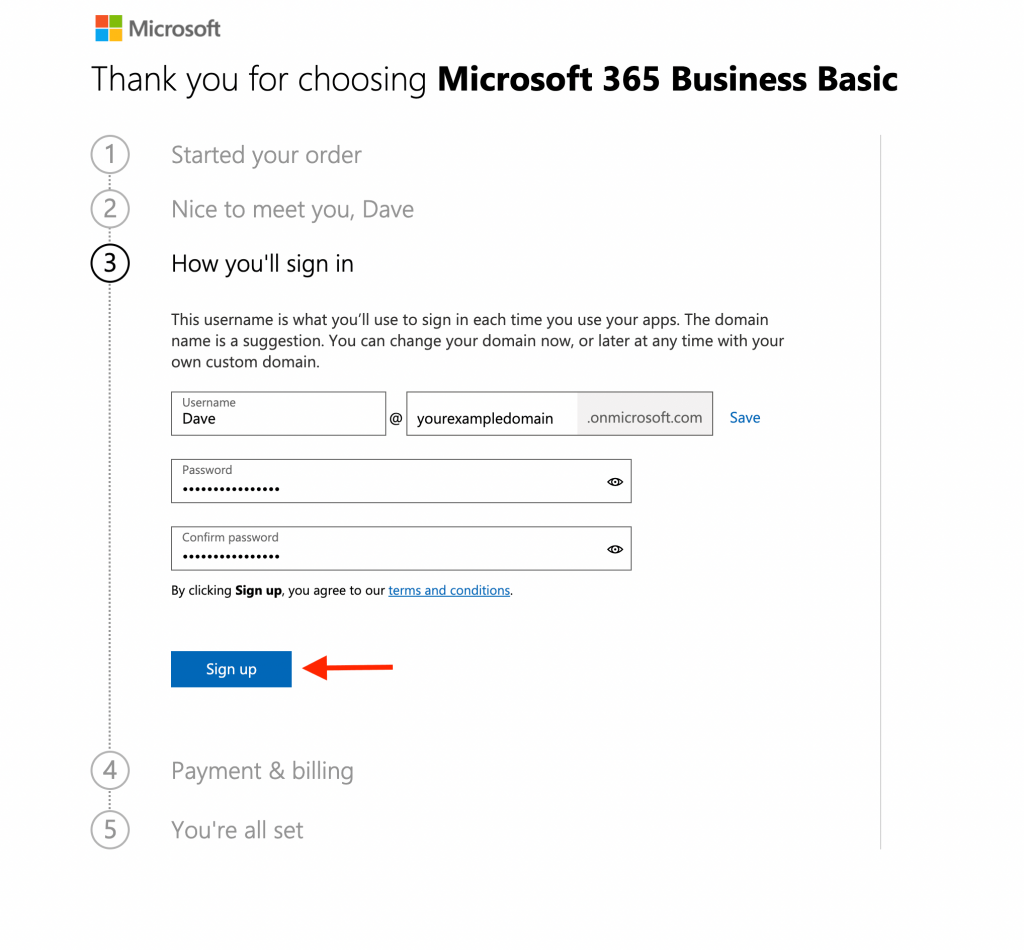
Pick a subdomain for your email address, this can be anything you’d like, it’s best to keep it pertinent to your business or brand. Click on Sign up.
Put in your personal and billing details.
Review your order and complete your purchase.
2. Connect an email domain to Microsoft 365
Microsoft is not a domain registrar, that means you’ll have to register and purchase your domain name separately, and then connect it to your Microsoft 365 email.
This will allow you to use a custom email domain on your Microsoft 365 subscription.
There are many domain name registrars, we recommend GoDaddy.
GoDaddy is a popular domain name registrar and manages around 78 million domain names for 17 million customers.
GoDaddy
GET EMAIL DOMAIN
Registering your own domain name with GoDaddy is easy.
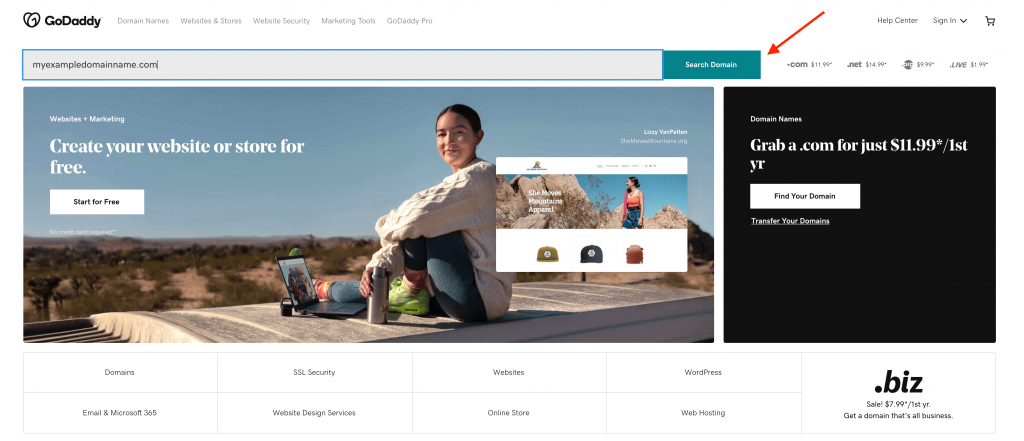
To start, go to the GoDaddy website.
At the top of their home page you’ll see a domain name search bar. Type in the domain name that you’re looking for and a domain name extension.
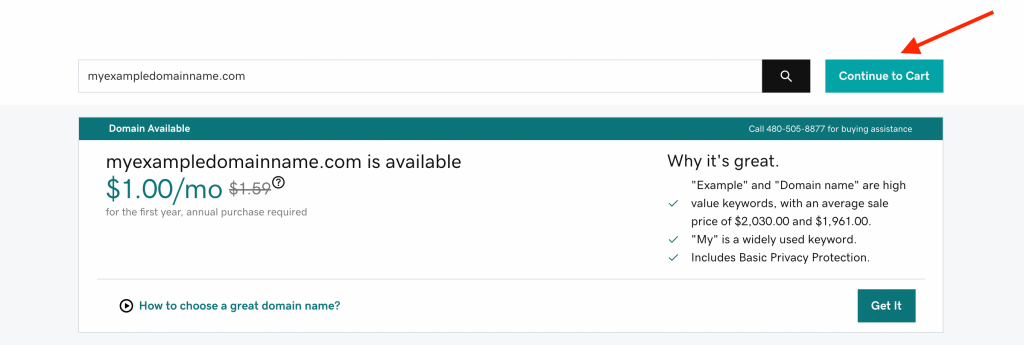
If your domain name is available, register it. This will allow you to connect and use it on your Microsoft 365 email subscription.
Once your domain name is registered, let’s connect it to your Microsoft 365 subscription.
Go to your Microsoft 365 online portal.
Click Setup from the left-hand menu, and then Domains.
Next, click the ‘Add Domain’ button.
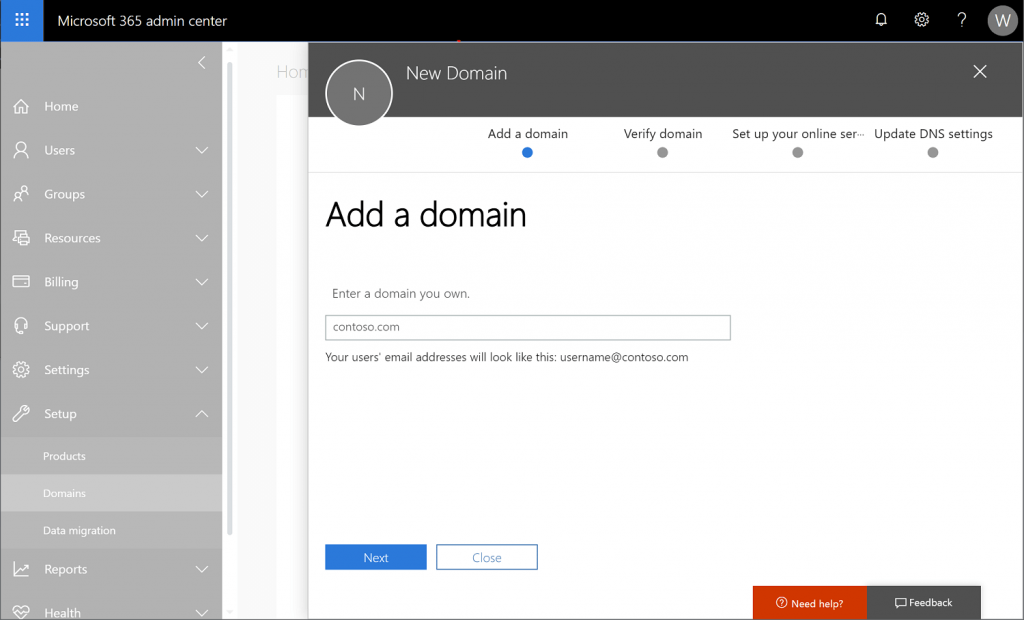
Enter the domain name you registered at GoDaddy.
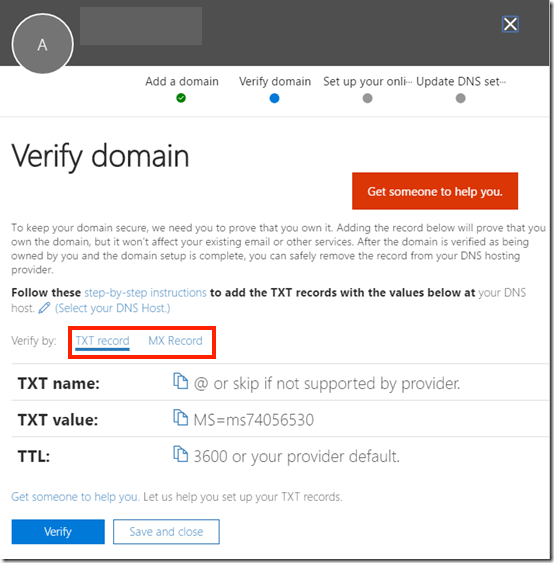
You’ll get a screen to verify domain name ownership along with DNS records to point your domain name to Microsoft.
Keep your Microsoft screen open to the DNS settings and open up your GoDaddy client portal.
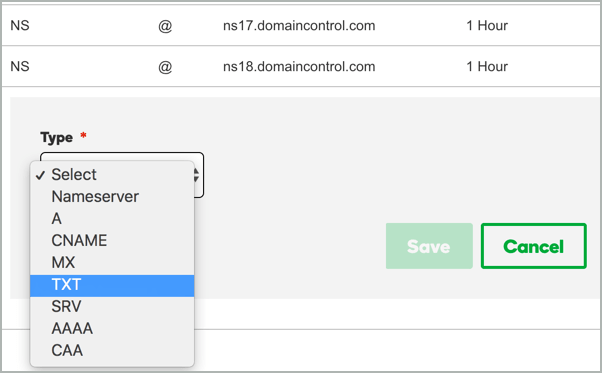
On your domain name portal at GoDaddy, click on your domain name and go to DNS settings.
On your DNS settings, click to add a new record.
Select TXT records. Add both of the TXT records you see at Microsoft to your GoDaddy domain name.
Make sure to add each TXT record individually and exactly as a you see it at Microsoft.
The TXT name, value, and TTL need to be added to your domain name at GoDaddy exactly as they appear on Microsoft.
After you’ve added the TXT records, switch to MX records and add those as well, exactly as you see them on Microsoft.
Once the DNS records from Microsoft are set on your domain at GoDaddy, click the Verify button at Microsoft.

Once verified, you can start using your custom email domain on your Microsoft account.
3. Create a custom email account on Microsoft 365
Now that you’ve registered your custom domain name, Microsoft 365 subscription, and successfully connected the two by DNS, let’s create your email account with your email domain at Microsoft 365.
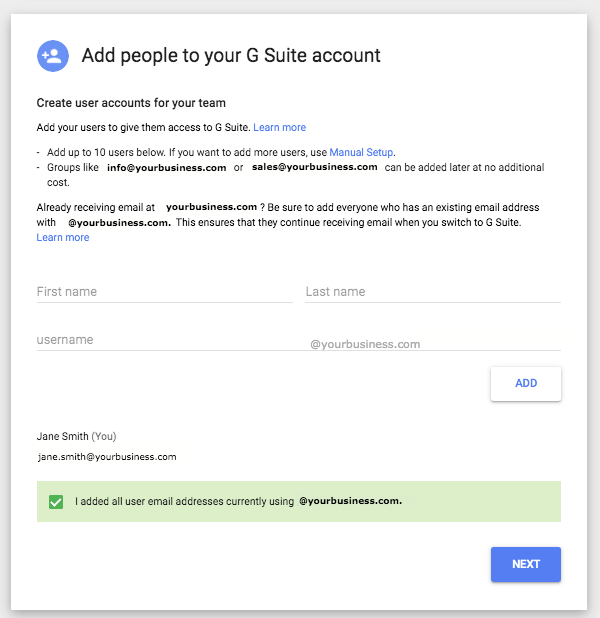
Go to your Microsoft 365 portal, when you log in to your account, go to the Active Users tab and select Add a user.
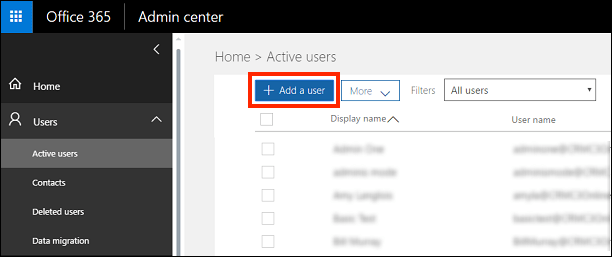
On the next screen, you need to enter your email details.
To save your user settings and create the email address, click on the Save button.
4. Use your email account at Microsoft 365
There are two ways you can access and use your Microsoft 365 email account, both by using Microsoft’s Outlook software.
Outlook can be accessed through a web browser or by app.
If you want to use your email on the go, then installing the Outlook app on your device is a good option.
You can download Microsoft’s free Outlook app and set up your account from there.
If you’d rather not install another application that uses more storage on your device, then accessing your email on Outlook through a web browser is a great option.
Outlook webmail
Go to Outlook.com and click Sign in.
To get to your email in your browser on Outlook, put in your email address and password.
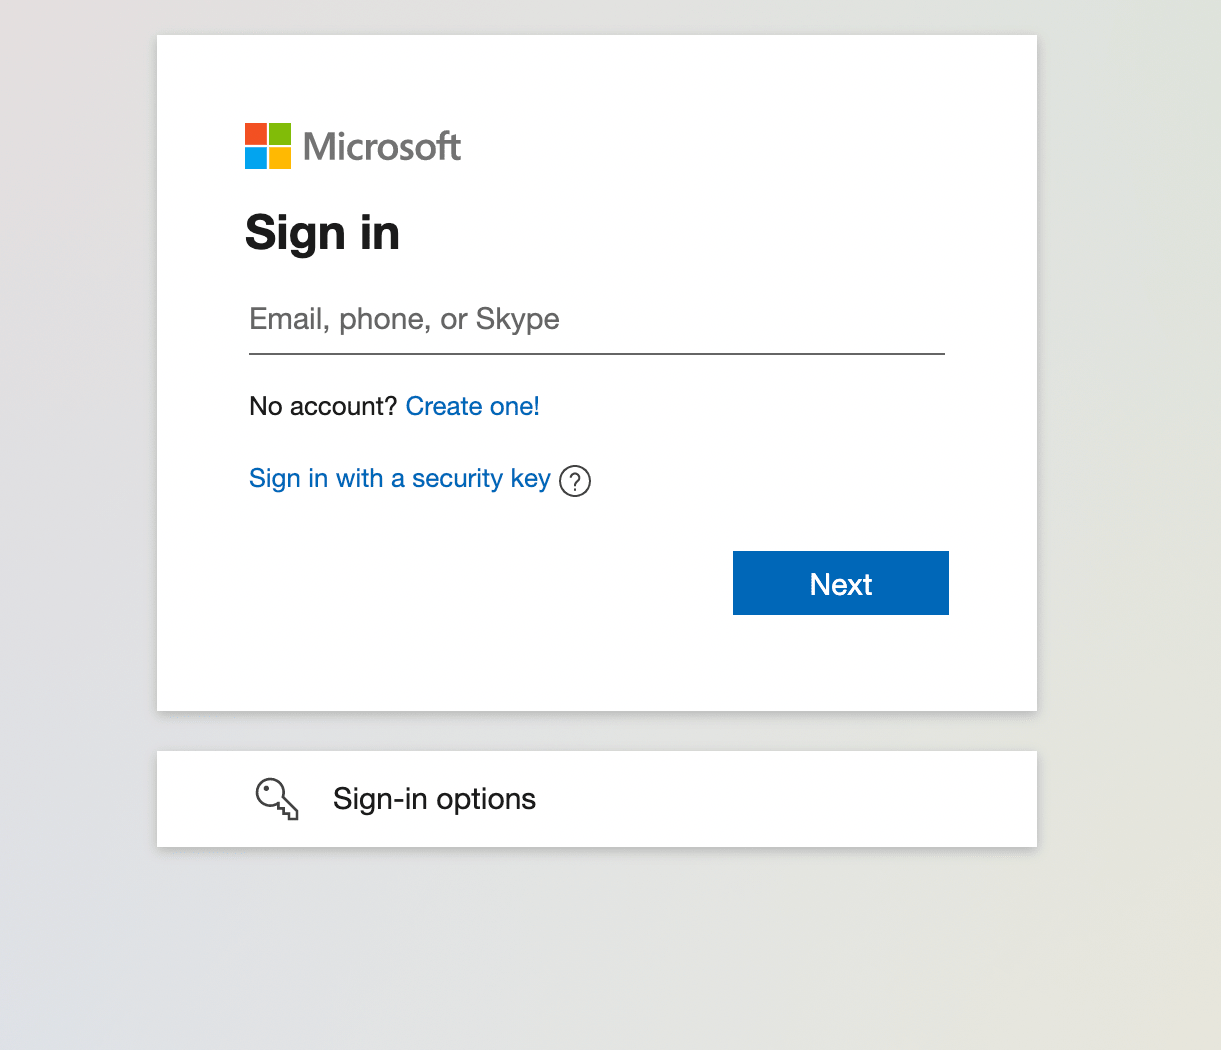
This will open up your email inbox in Outlook on your web browser.
Outlook app
To open your email on the Microsoft Outlook app, download and install the Outlook app from your device’s app or play store.

Sign in with your email address and password to see your emails on your mobile phone or tablet.
Google Workspace
Google Workspace by Google (NASDAQ: GOOG) is an email service where you can set up a custom domain name and use Google’s email and productivity suite.
The Google productivity suite includes Google Drive, Google Docs, Google Sheets, Google Calendar, Google Meet, and Gmail for your professional email.
Google Workspace
GET EMAIL DOMAIN AND EMAIL
To use a custom domain name with Google Workspace email, you can register your domain name with Google Domains.
Google Workspace is an excellent and reliable email provider.
1. Set up custom domain and email at Google Workspace
To get a Google Workspace account, head to the Google Workspace website and sign up for an email plan.

After you’ve picked a plan, enter your company name, size (if applicable), and country.

Next, fill out your contact information.
This will bring up the domain selection page.
Select ‘I’d like to buy a domain name.’ This will register your domain name with Google.

If you already have a domain name registered elsewhere, you can select ‘I have a domain.’
In our example, we will register our custom domain name with Google.

Enter your domain name, and click Next.
If your domain name is available, Google will show you a confirmation message and pricing. Click next to continue.

Enter payment details and complete the checkout process. Once you’ve checked out, you can create your email address on Google Workspace with your email domain.
2. Create a custom email account on Google Workspace
Once you create your Google Workspace account, click on the Go to Setup button.
On the Google Workspace email set up screen, you can create your email account.
You can add more than one. email account, just keep in mind each one has an extra charge based on your Google Workspace subscription type.
Once you’re done, you can click on Next to continue.
You’ve now created a Google Workspace email account!
3. Use your Google Workspace email account
Google has two convenient ways to access your email.
You can access your email on the Gmail app or Gmail webmail.
Gmail webmail
Go to myaccount.google.com. Sign in with your Google account, and select My products from the menu at the top of the screen.
Click on Workspace by Gmail underneath Your Products.
This will open up your email account on Gmail webmail on your browser.
Gmail app
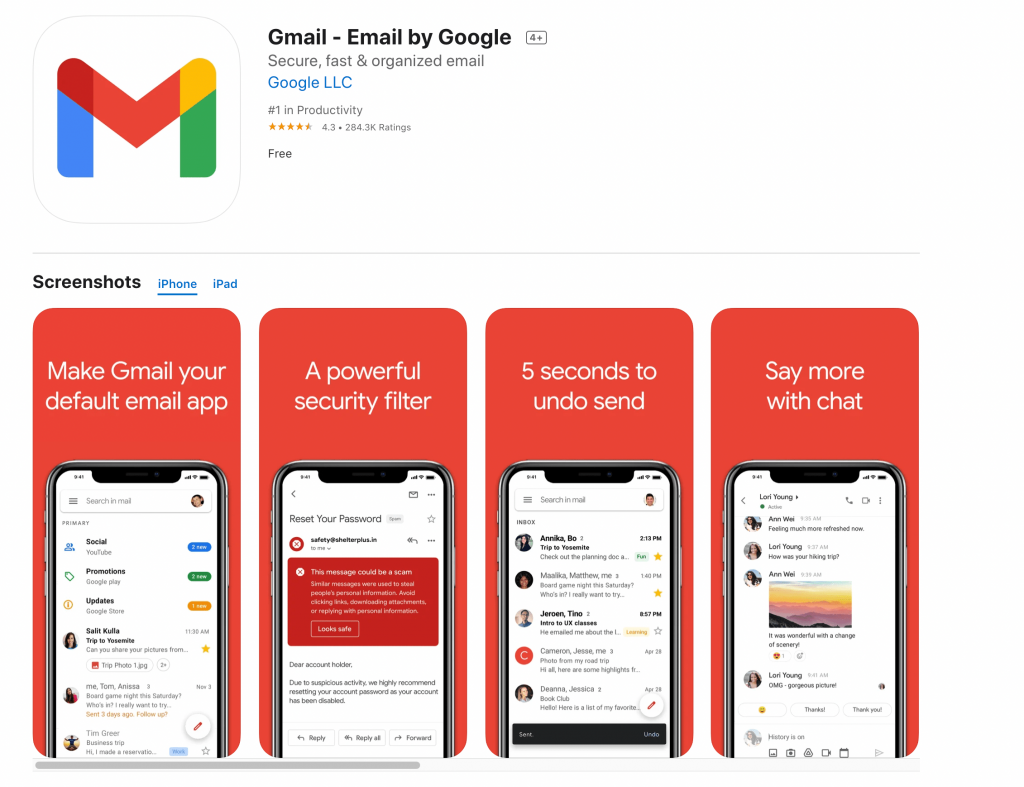
To access your email through the Gmail app on your device, download the Gmail app from your app or play store on your device, open the app and follow the setup instructions to connect your email address.
You can also use Google Chrome’s Bookmark Manager to add an icon for Gmail in your toolbar and access it quickly.
Google is amazing email software, however it can get pricey.
Normally, business owners start with free email services through providers like Skystra, Bluehost, and HostGator and then switch to Google Workspace when business really takes off.
Email Domain FAQ
Our guide has covered 5 different methods to get an email domain at Skystra, Microsoft 365, and Google Workspace. In addition, we’ve looked at how to get a free email domain and free email at Bluehost and HostGator.
Email domains are a popular topic and we receive a lot of questions about them.
Here is a quick round up of common questions and answers.
What is the difference between email hosting providers and free email domain services?
The simplest answer to this question is that email domains are used to register a domain name, while email hosting is how you set up your email address.
If you want to send and receive emails using a custom domain name, then you will require an email domain and email hosting provider. Normally, providers offer both of these services.
How much does it cost to register a domain name?
Registration fees are set individually by each service provider and range from free up to hundreds of dollars depending on the domain extension.
Typically, you should expect to pay anywhere from $12 to $18 per year for a .com domain name.
Where can I get a free email domain?
We covered two companies that provide a free email domain, Bluehost and HostGator.
Using this guide, you can register a free domain name and get free email set up on your hosting services at these two providers.
Where can I get a free professional email address?
We’ve also covered how to get free email at Skystra, who provide transparent and fair domain name registration rates.
You can create unlimited free email addresses with your custom domain name at Skystra.
Which is the best free email domain provider?
Bluehost is our top recommendation for the best free email domain provider.
For free business email, we recommend Skystra.
We hope that this guide has helped you get a free email domain and professional email for your business.
If you have any questions or tips on getting a free email address, free email domain, or need some advice, leave us a comment below!
Infoceptor's editorial team handpicks all of the products and services it recommends, regardless of external influences. Affiliate links appear in some of our stories. We may receive an affiliate commission if you purchase something through one of these links, which helps us stay independent and support our great team.


